zondag 28 februari 2010

Ground Beef Curry (Keema Kari)

While perusing the entries for this month's Taste & Create I came across Min's version of this Ground Beef Curry. I had an instant craving for this and it gave me the opportunity to use the roti's that I still had in the freezer.


The smells that came from the pan while everything was simmering were absolutely delicious! The dish itself tasted really good, I really loved the kick of the chili powder and I'm sure that I will be making this again!!

Ground Beef Curry
1/2 tbsp sunflower oil
1 1/2 onions, finely chopped
1/2 tbsp minced garlic
1 tbsp ground ginger
1 tsp ground turmeric
1/2 tsp ground cinnamon
1 tsp cumin seeds, crushed (I used cumin powder)
1 tsp coriander seeds, crushed
1/2 tsp chili powder
500 grams extra lean ground beef
4 medium firm potatoes (skin on), cubed
1 x 400 grams can diced tomatoes
1 cup beef stock
salt and pepper to taste (I left these out as my curry already had plenty of taste)
1 bunch of spinach, washed, stalks removed and shredded
  • Saute onion over medium heat in oil until soft. Add garlic, ginger and spices, fry for 2-3 minutes until fragrant.
  • Add beef and brown over medium to high heat.
  • Add potatoes, tomatoes and beef stock, turn heat down and allow to simmer for 30 - 40 minutes or until potatoes are cooked through.
  • Season to taste with salt an pepper (as said I skipped the salt and pepper, it was not needed in my opinion) and stir spinach through. Turn heat off and allow to rest for a few minutes for the spinach to wilt into the curry.
  • Serve warm with rice or rotis.


vrijdag 26 februari 2010

TWD: Honey-Wheat Cookies

Finally finished this weeks recipe for Tuesdays with Dorie: the Honey-Wheat Cookies that were picked by Michelle of Fourchild. These cookies were quite easy to put together, then they need some time in the fridge before you shape and bake them.


They look delicious as they have a lovely golden colour. I'm freezing them so that I can take them into work with me next week. The recipe can be found here or at page 81 of Dorie Greenspan's Baking From My Home To Yours. Go here to check out what my fellow TWD-ers thought of the Honey-Wheat Cookies.


woensdag 24 februari 2010

Flowered Apple Pie for Taste & Create


Somewhere between typing up this post and publishing it I forgot to hit the 'save'-button... I will tell you all about this pie and Dave of My Year on the Grill later tonight when I'm back home as well as my Adopt-A-Blogger-post that seems to have disappeared completely....

For now just letting you know that this is my entry for Taste & Create, where I was paired with Dave of My Year on the Grill.


-------------------------------------------------------------------------------------------------------

I felt that it was time for me to have another go at Taste & Create, so I signed up in time and waited to be paired with another participant. I always enjoy finding out who I'm paired with and browsing their blog for yummy posts.


This time I was paired wit Dave of My Year on the Grill, oh my gosh does he have a lot of delicious recipes posted on his blog! What impresses me a lot is that he just moved from Kansas City to St. Thomas in the US Virgin Islands and just keeps on adding new posts.... I had just one tiny problem when it came to figuring out what to pick to make... Most of them were made on a grill and I do not own one... This problem was solved as soon as I spotted this gorgeous Flowered Apple Pie, it looked sooo pretty and I knew I had to make it!

Flowered Apple Pie
2 Granny Smith apples
1 pie crust ( I made my own using Dorie Greenspan's recipe for Sweet Tart Dough, it can be found on page 444 of Baking From My Home To Yours, or here, and partially baked it)
100 grams marzipan paste
2 tbsp brown sugar
3 tbsp powder sugar or regular sugar (I used regular sugar)
2 tsp cinnamon
1/2 tsp orange zest (I used lemon zest)
2 or 3 tbsp butter, cut into very thin slices
orange reduction or apricot jam (I used strawberry jam because I ran out of apricot jam)


Choose 2 nice apples, wash, peel , cut into half and core them. Then cut them into 1/8 inch slices and have ready to top the tart with. (I actually quartered the apples before I saw that they had to be halved.... So then I simply proceeded to cut them into 1/8 slices).


In a food processor mix the cinnamon, brown sugar, lemon zest and marzipan paste until well combined (I accidentally added the regular sugar into this mix and only found out after I already turned on the food processor, so my pie was just a tad sweeter....)


Pour the mixture into the pie crust and top with apple slices, beginning at the edges.


Arrange them nicely so it looks like a flower at the end. Just tuck them in nicely as if they were a rose's petals.


When you're done, top with the powdered sugar or regular sugar (I used one tbsp of cinnamon sugar for this).


Then top with the butter that you have cut into thin slices or small pieces.


Bake at 425 degrees Fahrenheit for 25 to 40 minutes (mine only needed 25 minutes), depending on how fast your apples will look baked. Some of the apple edges will begin to brown. Heat up the orange reduction or apricot jam a bit and brush it over the apple tart. (Here's where I found out that I had run out of apricot jam, so I used what I had at hand: strawberry jam. I must say that it created a lovely pinkish hue over the apple pie).


Let cool at least 10 minutes before cutting.


Isn't it pretty? And tasty too!!!


If you want to join in on the fun, go to Taste & Create and check out how you can sign up for next month and see what the other participants cooked/baked up. To see what Dave thought of my Salmon Skewers with Maple/Mustard Glaze go here and see what he did with my Garlic Noodles here.


dinsdag 23 februari 2010

TWD: My Best Chocolate Chip Cookies

Yes, I know I got my schedule screwed up: I should have posted about the Honey-Wheat Cookies that Michelle of Flourchild picked as this weeks recipe for Tuesdays with Dorie. I guess I should really start writing down what recipe I have to finish when in my agenda! I am going to bake the Honey-Wheat Cookies on my day off tomorrow and post about them Thursday :)


On to My Best Chocolate Chip Cookies: now these cookies were picked for February 16th by Kait of Kait's Place, the recipe can be found here. What can I tell you about these cookies? To be honest: not much.... Since my pain attack and loss of appetite (that lasted for over a monht) around Christmas I haven't been eating a lot of sweets: they have just lost their appeal. I can taste that they are good (or bad), but I simply don't crave them anymore. I will be seduced by the lovely smell and have a bite or two and then somehow there's an aversion to eating the rest... I must admit that this is not necessarily a bad thing as I do have to loss quite a bit of weight: by now I have lost 10,5 kilos without even dieting!!


However I can tell you that these cookies were a huge hit at work, as well as with my mom, dad an SIL. One of my colleagues actually told me that they reminded him of the Chocolate Chip Cookies he had when he was in the United States this summer: crunchy on the outside and chewy on the inside. You see, the CCC's that are sold here in The Netherlands are mostly chrunchy allover.... I did have my two bites of the cookie and could taste that they were really nice, but they were too sweet for me -->> see, I told you my tastebuds have changed? Cookies and such were never too sweet for me: the sweeter, the better was my motto....


Tomorrow I will tell you about my two adoptees for Adopt-a-Blogger. I'm so excited about finally participating in this event!! I'll also be posting my entry for this month's Taste & Create. And Thurday I will post my Honey-Wheat Cookies for TWD, I promiss!!

woensdag 17 februari 2010

Apple Cinnamon Pancakes

Yes, that's right: more pancakes!! I actually made these the same day I made the Buttermilk Pancakes and boy was I happy with them today.... After sleeping for the biggest part of the day due to a migraine attack it was really convenient to pull these out of the freezer and pop them into the toaster!


I found this recipe at Les Gourmandises d'Isa. You guys should really check out Isa's blog, she has amazing recipes on there. I love visiting it as it's written in French and gives me a chance to practice my French :)


Apple Cinnamon Pancakes
(adapted from Les Gourmandises d'Isa)
2 eggs
1 1/2 cup yoghurt
2 cups all-purpose flour
1 1/2 tsp baking powder
1/2 tsp salt
1/4 cup vanilla sugar
3 apples, peeled and grated
1 1/2 tsp cinnamon
butter for baking
maple syrup for serving
  • Mix the eggs with the yoghurt in a big bowl.
  • In a small bowl mix the flour, baking powder, salt and vanilla sugar.
  • Mix the wet and the dry ingredients.
  • Add the grated apple and cinnamon and mix well.
  • Melt some butter in a pan over low heat.
  • Put 1/4 cup of batter in the pan and flatten it with the back of a spoon.
  • Make sure that the center is not thicker than the edges of the pancake or it will be undercooked.
  • Bake until the bottom of the pancake is golden.
  • Turn pancake and cook for a couple of minutes.
  • Serve topped with some butter and/or maple syrup.


dinsdag 16 februari 2010

Turkish Aubergine Dip


A while ago I had dinner at my colleague E.'s house and got treated to a Turkish dinner. What a great surprise!! You see, my colleague E. is engaged to a A., who is from Turkey and therefor she cooks Turkish dishes on a regular basis. I really enjoyed all the different flavours I got to taste and decided I would try to recreate the dip that she made that night: she made it sound so easy!!

It was quite an easy recipe, you need some simple ingredients: most of which I always have at hand, so this weekend I picked up some Turkish bread at the market and made the Turkish Aubergine Dip to serve with it.


Turkish Aubergine Dip

1 aubergine
1 clove of garlic, peeled and chopped finely
4 tablespoons of turkish yoghurt (greek yoghurt can also be used)
salt and pepper to taste


Preheat the oven to 250 degrees Celsius (about 482 degrees Fahrenheit).


Rinse the aubergine and pierce the skin of the aubergine in several places. Put the aubergine on a lightly oiled bakingsheet and place it into the oven for 30 minutes or untill the skin is wrinkly, like in the picture above. Turn the aubergine after 15 minutes.

Take the aubergine out of the oven and let it cool. When cooled, slice the aubergine into halve lenghtwise. Scoop out the flesh and mash it with a fork.

Mix the mashed aubergineflesh with the garlic, yoghurt and add salt and pepper to taste. (You can also put the aubergineflesh into a food processor and process to a smooth puree, but I find that if you mash it by hand you have a more 'rustic' looking dip and less dished to wash)


Serve with some Turkish bread of Pita bread.


zondag 14 februari 2010

Apple, Cinnamon and Pecan Crumble and a short Valentine's Day review

Last Wednesday I went to Ladies Night at a cinema nearby with a couple of friends. Whenever we get together to go see a movie we always enjoy having diner together too, this gives us the time to catch up on everything. So this time we ate at my friend's C.'s house and she asked me to bring dessert. Why my friends keep asking me to bring dessert over when we have a dinner party is a complete mystery to me ;)

Since it had started snowing again I was in the mood for something warming and wintery. I went to my bookmarks over at delicous.com and searched through them until I came across the perfect dish. I spotted these crumble bars over at Dessert First in September, they looked gorgeous so I simply decided to not make bars but serve this as a dessert. It was delicious!! When I plated the crumb it was actually still warm and gooey. It was a bit too sweet for my taste though... I never thought I would say this, but apparently my tastebuds and preferences have changed since I was sick in December 2009.... Next time I'll add a little less sugar to the crumb. However my friends C., I. and the babysitter M. all loved it and didn't think that the crumb was too sweet at all. Neither did my parents who got to enjoy the leftovers :)

The movie we saw at Ladies Night was 'Valentine's Day'. Don't worry, I'm not going to tell you what it's about and spoil the whole move for all of you that still want to go and see it. The three of us really liked it. It reminded me of 'Love Actually' with all the different story-lines within the movie. This is a perfect movie for a girls-night-out: a real feel-good-movie, I personally wouldn't go see it with a (potential) boyfriend.... Visit the official 'Valentine's Day' website for the trailer. Let me know if you saw the movie and what you thought of it!!

Now on to the actual Valentine's Day: I don't really like this day.... First of all I think it's such a commercial day, I prefer for my sweetheart to surprise me with something on any day: not just because it's Valentine's Day. And second of all somehow I've always been single around Valentine's Day, which (like Chrismas and New Year's Eve) is absolutely no fun!!!


Apple, Cinnamon and Pecan Crumble
(adapted from Dessert First)


Filling
3 large tart apples (about 1 3/4 lbs total)
3 tablespoons softened unsalted butter
3/4 cup sugar
2 tablespoons lemon juice
2 tablespoons all purpose flour
3/4 teaspoon ground cinnamon

Crust
2 cups all purpose flour
1 teaspoon baking powder
1/2 teaspoon salt
6 tablespoons softened unsalted butter
3/4 cup light brown sugar
1 egg, room temperature

Streusel
1/2 cup sugar
2/3 cup plus 2 tablespoons all purpose flour
1/8 teaspoon salt
6 tablespoons cold unsalted butter, diced
1/4 cup pecans, roughly chopped

Preheat oven to 350 degrees F.
Make the filling:
  • Peel, core, and chop the apples in 1/2-inch cubes.
  • Set aside in a bowl.
  • Melt butter in a sauté pan over medium heat.
  • Add the apples and sauté for about 8 minutes until the apples are semi-soft.
  • Add sugar, lemon juice, flour, and cinnamon to the apples and stir to combine.
  • Cook until mixture begins to bubble, then turn heat to low and cook for another 3 minutes, stirring constantly.
  • Transfer filling to a bowl and let cool while you make the crust.


Make the crust:

  • Line a 9 by 13 inch pan with aluminum foil, leaving enough to hang over the edge and act as handles to remove bars after baking.
  • Grease foil.
  • Whisk flour, baking powder, and salt together in a bowl and set aside.
  • In a stand mixer, cream butter and sugar together on medium speed for several minutes until light and fluffy.
  • Add egg and mix to combine.
  • Add flour mixture and mix to combine.
  • Pour the dough into the prepared pan and gently press into the bottom of the pan and about 1/4” up the sides, making sure it is level.
  • Set pan aside while you make the streusel.


Make the streusel:

  • In a stand mixer, combine sugar, flour, and salt and mix to combine.
  • Add butter and mix until crumbly and the butter pieces are very small.
  • Add pecans and mix just to combine.


Assembling the crumble:
  • Spread cooled apple filling evenly over the crust, leaving about 3/4” between the pan sides and the filling.
  • Sprinkle the streusel evenly over the filling.
  • Bake for about 35 minutes until the top layer is golden.
  • Cool completely on wire rack before removing.

    Enjoy!

zaterdag 13 februari 2010

Teaser: Apple, Cinnamon and Pecan Crumble

Doesn't this look gorgeous? I'll post the recipe plus my thoughts on Valentine's Day (both the movie and the actual day) tomorrow.....

vrijdag 12 februari 2010

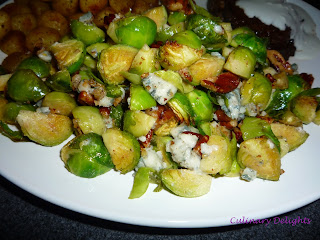
Roasted Brussels Sprouts with Pecans and Gorgonzola

We had about two days without any snow. Then Wednesday came and it started snowing again. Below is the view from my window at work since yesterday, I must admit I do like the look of it. But I still think the snow/ice is a pain in the ass, especially since I have to drive for an hour to get to work, which is quite long for Dutch standards.


Because of the snow I had been craving winter vegetables. Brussels Sprouts were on sale at the supermarket, so I went and surfed the Internet to find the perfect recipe. I found loads of great once but this one for Roasted Brussels Sprouts with Pecans and Gorgonzola at Kalyn's Kitchen caught my eye, I knew had some pecans and gorgonzola on hand so this didn't even require a trip the the store.


What was great about this recipe is that it only requires some preparation, then you slide it into the oven and you have your hands free to make other yummy dishes like the marinated flank steak with blue cheese sauce that I served with it and blogged about yesterday.
I really enjoyed the Brussels Sprouts prepared this way although I did find the gorgonzola a bit harsh. But that's solely to blame on me as I picked up the wrong cheese: I prefer the Gorgonzola Dolce but had the regular on in the fridge.


Recipe can be found here at Kalyn's Kitchen.

donderdag 11 februari 2010

CEiMB: Marinated Flank Steak with Blue Cheese Sauce


This week it was time for Blair of Deliciously Golden to pick a recipe for Craving Ellie in My Belly. She decided on Marinated Flank Steak with Blue Cheese Sauce, recipe to be found here at Blair´s blog or here at Foodnetwork.


Gorgonzola was the Blue Cheese of my choice and I was pleasantly surprised with the taste combination of the balsamic vinegar and the gorgonzola cheese! I served this with delicious Ovenroasted Brussels Sprouts with Pecans and Gorgonzola (recipe will follow tomorrow) and potatoes. Another great recipe that I will be making again. Go here to check out what my fellow Elliestas thought of this recipe.


vrijdag 5 februari 2010

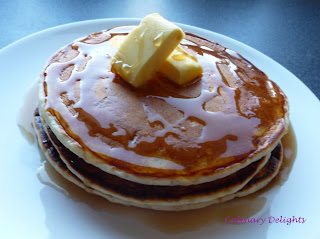
Buttermilk Pancakes

When I first visited Canada I was introduced to the American Pancake, these pancakes were quite different to the pancakes I was used to. In The Netherlands we bake pancakes that are bigger in diameter but thinner in thickness, they are however slightly thicker that the french crêpe. Our batter is more liquid that the batter for American Pancakes and the pancakes need less cooking time. We eat our pancakes au naturel or with eiter apple, bacon, cheese or a combination of these ingredients baked into the batter, we then top that with either butter and confectioner's sugar or stroop (molasses). You can find a great recipe for Appel Pannenkoek (a.k.a. Dutch Apple Pancakes with Caramelized Sugar) at Almost Bourdain.

Picture of the Appel Pannenkoek by Ellie of Almost Bourdain.


Now, 13 years later, I have finally made my own pancakes from scratch for the first time. And I must say it was much easier than I thought it would be! I used this recipe from Cooking Light for Buttermilk Pancakes. These were sooo good: I've actually been eating them every workday this week. This recipe makes 9 pancakes, I wrapped up two pancakes in a Ziploc-bag, with a small sheet of parchmentpaper between the pancakes and popped the Ziploc bags into the freezer. I then proceeded by removing one bag from the freezer every evening and warmed up the pancakes in the morning: what a great way to start the day!


The recipe tells you to measure out 1/4 cup of batter for one pancake. However when making these I accidentally used my 1/3 cup to measure out the pancakes, somehow I still ended up with 9 pancakes....


Ingredients
1 1/2 cups all-purpose flour (about 6 3/4 ounces)
2 tablespoons sugar
1 teaspoon baking powder
1/2 teaspoon salt
1 1/2 cups fat-free buttermilk
1 tablespoon butter, melted
1 large egg, lightly beaten


Preparation
Lightly spoon flour into dry measuring cups; level with a knife. Combine flour, sugar, baking powder, and salt in a bowl; stir with a whisk. Combine buttermilk, butter, and egg; add to flour mixture, stirring until smooth.

Pour about 1/4 cup batter per pancake onto a hot nonstick griddle or nonstick skillet. Cook 2 minutes or until tops are covered with bubbles and edges look cooked. Carefully turn pancakes over; cook 2 minutes or until bottoms are lightly browned.


dinsdag 2 februari 2010

A Hot Pink Butterfly Cake instead of TWD's Milk Chocolate Mini Bundt Cakes

You probably came here today expecting to find the Milk Chocolate Mini Bundt Cakes that were picked by Kristin of I'm Right about Everyhing for Tuesday with Dorie. Sorry, I didn't make them... As some of you know I accidentally lost about 17 pounds since Christmas and in an attempt to keep them off of me I'm limiting myself to one treat per week. Please go here to see how the mini bundt cakes turned out for the TWD-ers who made them. The recipe can be found over at Kristin's blog.


So now on to this weeks treat... It was something my mom and I had been looking forward to since the beginning of November 2009: we had planned to take a Christmas-themed cake decorating workshop at Sweet Things in Utrecht on the 23rd of December 2009. However unfortunately we had a huge snowstorm that day and the workshop was cancelled due to the weather. We were so dissappointed!!


Soon we rescheduled the workshop for the 1st of February 2010. When I woke up that morning I was so excited, but that excitement soon grew to worry when I got in the car and heared the weather report for that day: snow, snow and more snow.... I instantly thought my mom and I were jinxed: this could not be happening: the workshop could not be cancelled twice due to snow!! We hardly ever get snow here in The Netherlands: maybe two or three times per winter, now it seems that it has been snowing everyday since Christmas!!!I contacted Sweet Things as soon as I arrived at work and was very happy to hear that the workshop was still on!


I drove to Utrecht from work in Arnhem and picked up my mom from the trainstation. When we arrived we got to sample a cute cupcake and some coffee or tea as we waited for the other 4 people that would attend the workshop to arrive. Soon the workshop started: the cakelayers and buttercream had already been prepared in advance, so we got to pick a buttercreamflavor (strawberry, chocolate or caramel; both my mom and I picked caramel). We layered together two cakelayers and the buttercream of our choice, then the cake was put in the freezer.


Time to colour the marzipan: I wanted to have a bright, hot pink layer of marzipan to cover my cake with, so I got some gel and kneaded it through the marzipan.


Isn't it that a gorgeous pink colour???


Then we took our cakes out of the freezer and took some regular buttercream to crumbcoat the cake, here's my mom hard at work!


My cake after crumbcoating it. Then the cakes went back into the freezer and we got to pick colours and figures to put on our cakes.


I went with a butterfly-theme, and picked a lighter pink, a burgundy purple, black and white to cut the butterflies out of.


The next step was to roll out our marzipan, put it over the cake, make sure it covered all sides nicely without any air under it and cut the marzipan to size. The roling out part was fun: instead of using flour like I normally do when rolling out a dough, we had to use confectioner's sugar to keep the marzipan from sticking to the counter.


On to the decorating: to remove the white smudges of confectioner's sugar on both the cake and the decorations we used a slightly damp brush and brushed over the cake, then placed the decorations where we wanted them and brushed them with that same brush.
This purple cake is my mom's.


And here's mine: pretty pink, covered with butterflies!


All six of us made very different, but beautiful cakes!
My mom and I had a blast, time flew by and before we knew it it was time to wrap up our cakes and go home. I can't wait to go back to work Thursday and let my colleagues taste this cake!


Mom and I are already planning our second workshop with Sweet Things.
Up next? The Two-Tier workshop!!